Work History

West-Sussex-Tile-Doctor

Welcome to my Work History archive where you will find detailed examples of Tile, Grout and Stone Cleaning and renovation work carried out within West Sussex.

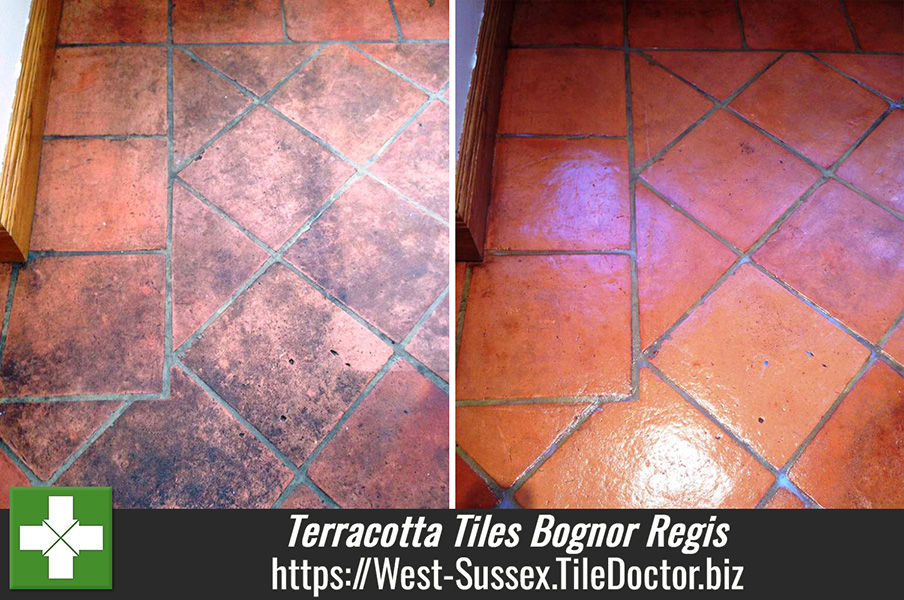
Terracotta Tiles Before After Cleaning Bognor Regis

Deep Cleaning Terracotta Tiles in Bognor Regis

I was contacted just before Christmas by a couple who had bought a house in the southern resort of Bognor Regis that they hoped to spend the festive season in; apart from a new coat of paint and carpet their main concern was the state of the Terracotta tiled floor in the hall, kitchen and dining room. On my initial site inspection it was clear that there were years of grime build up caused by the previous owner’s dogs coming into the house onto a poorly sealed floor. After assuring the client that I was confident that the floor could be bought back to life a price was agreed and a date fixed. I estimated it would take two days to carry out the work with a gap of two days in between to allow the floor to fully dry out.

Terracotta Tiles Before Cleaning Bognor Regis Terracotta Tiles Before Cleaning Bognor Regis

Deep Cleaning Terracotta Tiles

On the first day I prepared a warm water dilution of Tile Doctor Pro-Clean and worked this into the tile surface and grout using a hand brush and then the buffing machine fitted with a black scrubbing pad. This lifted all the residual dirt, grime and remaining sealer if any. After vacuuming up the dirty solution using a wet Vac the floor was then rinsed several times with clean water to make sure that there was no cleaner or dirt left in or around the tiles.

There were a few stubborn areas where it was necessary to repeat the process and then the whole floor was given a final rinse using the wet vacuum and sponge to get the surface as dry as possible before being left to dry for two days. The tiles were covered with dust sheets in any area that was required for access in order to keep them clean whilst drying out.

Sealing Terracotta Tiles

After allowing the floor to dry out I returned to the property and using my moisture meter tested the floor in several areas to make sure that it was ready to be sealed (I had previously warned the clients that if it wasn’t then further time would have to be given). Satisfied that all was well I set about sealing it, first with a coat of Tile Doctor Colour Grow which was allowed to cure and then followed by five coats of Tile Doctor Seal and Go. Colour Grow is an impregnating sealer that seeps into the pores of the stone protecting it from the inside and as a bonus enhances colour whilst Seal and Go is a topical sealer that protects the surface and also adds a nice sheen to the tile. The end result was everything that I imagined it would be and the clients were very pleased with it also saying that they never thought it would ever look as good as it did. As I said to them ‘I’m no magician but I am a (Tile) Doctor!!

Terracotta Tiles After Cleaning Bognor Regis Terracotta Tiles After Cleaning Bognor Regis


Terracotta tiled floor deep cleaned and sealed in West Sussex

Deep Cleaning Terracotta Tiles in Bognor Regis Read More »

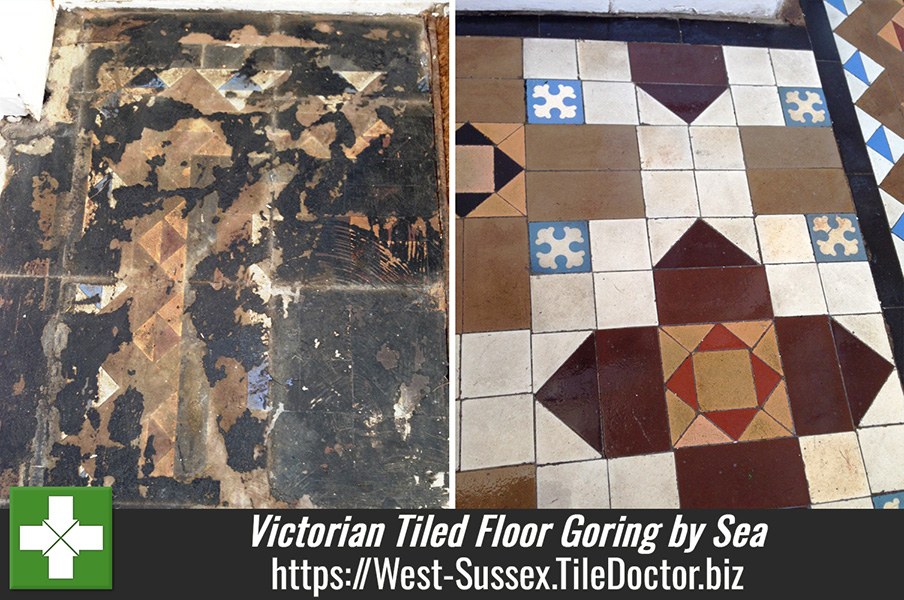
Victorian Tiles Goring by Sea Before After Renovation

Victorian tiled floor restoration Goring by Sea

We were contacted by a letting agent who managed a large town house in Goring by Sea that had been turned into flats. The area they wanted dealing with was the entrance hall where the original Victorian tiled floor had been covered over with linoleum tiles backed with a bitumen based adhesive and after removing the tiles the floor was now in a terrible state. I was confident that they could be restored however in extreme cases like this there can be no guarantee of the end result so I set their expectations accordingly.

Victorian Tiles Goring by Sea Before Renovation Victorian Tiles Goring by Sea Before Renovation

Restoring Victorian Floor Tiles

I started the job by softening the old adhesive with an application of Tile Doctor Remove and Go which was left to soak into the tile before using a paint stripping blade to carefully lift it off. This process had to be done over the entire area before I could start on the cleaning and once finished the floor was given a good rinse.

The tiles were now mostly free of the adhesive but were very grubby so I started over but this by time by applying a strong dilution of Tile Doctor Pro-Clean which is a powerful tile cleaning product designed for use on stone, tile and grout. The solution was left to soak into the tile before being worked into the remaining dirt and grime using a buffing machine fitted with a scrubbing pad. One done the floor was thoroughly rinsed and any areas that needed it were spot treated.

Sealing a Victorian Floor Tiles

The floor was left to dry out for a few days after which we came back to seal it with four coats of Tile Doctor Pro-Seal which is a penetrating sealer which gave the desired natural look finish and will provide long lasting stain protection by soaking into the pores of the tile and preventing dirt from becoming ingrained there. You have to wait for each coat to dry before moving on to the next so it did take a while.

Victorian-Tiles-Goring-by-Sea-After-Renovation-3 Victorian Tiles Goring by Sea After Renovation

This was a tough job but certainly well worth the effort both the letting agents and residents all said how great the floor now looked.

Victorian Tiled Hallway Floor Restored in Sussex

Victorian tiled floor restoration Goring by Sea Read More »

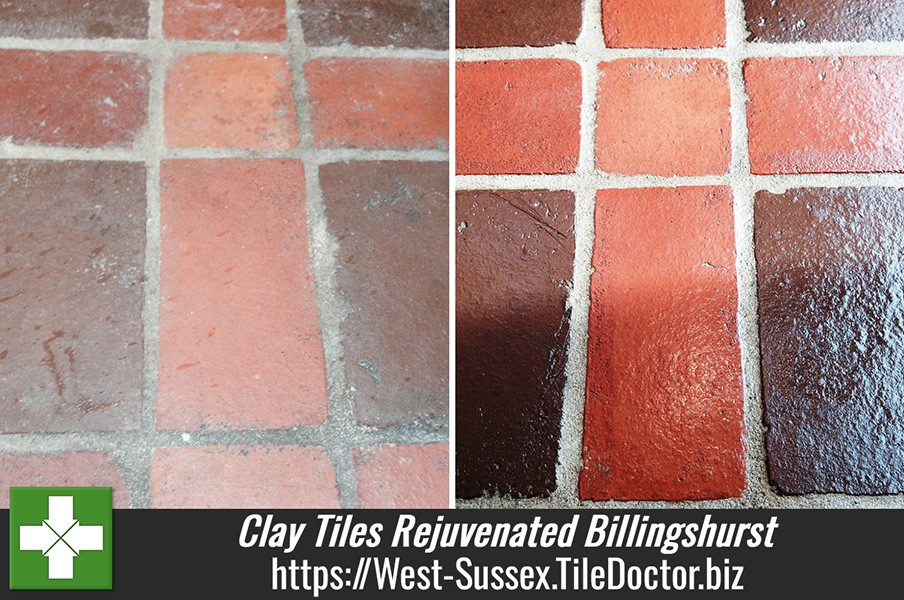
Clay Tiles Rejuvenated in Billingshurst Before After

Clay tiles Rejuvenated in Billingshurst

Similar to Terracotta these clay floor tiles had been installed throughout the ground floor of this house in Billingshurst including the hall, utility, WC and kitchen. The owner of the property had recently moved out into a new house and was planning on renting it out however none of the tiles had seen any sealer in a long time and although the tiles were in good condition they had a rough finish which had resulted in patchy grout smears as well as the general grime and old sealer build up that needed to be deep cleaned to get the tiles back to their former glory.

Clay Tiles Rejuvenated in Billingshurst Before Clay Tiles Rejuvenated in Billingshurst Before

Cleaning Old Clay Tiles

To clean the floor I first applied a strong dilution of Tile Doctor Pro-Clean and worked it into every nook and cranny using a hand brush and deck broom. After 10 minutes I used a buffing machine fitted with a black scrubbing pad and worked it over the areas until satisfied that all was clean. After washing the floors down several times to neutralise the cleaning agent and extracting with a wet vacuum I checked the entire area for any problem spots. There were a few stubborn areas that needed re-treating but the main issue was the grout smears which must have been then since the floor was laid. Fortunately we have a solution for most problems and in this case we have a product called Tile Doctor Grout Clean-Up which is very good at removing grout from tile, it an acid based product so you can’t leave it on the tile too long and once it’s worked its magic you need to wash the floor down again to remove any trace of chemical.

Sealing Old Clay Tiles

I left for the evening and returned two days later to ensure the floor would be dry which it was. The tiles need to dry to achieve the best results with the sealer which in this case was Tile Doctor Seal and Go which is a water based sealer that adds a subtle shine effect as well as providing lasting stain protection. Four coats of sealer were required and as you can see from the photographs the difference is quite remarkable.

Clay Tiles Rejuvenated in Billingshurst After Clay Tiles Rejuvenated in Billingshurst After


Clay tiled floor cleaned and sealed in Sussex

Clay tiles Rejuvenated in Billingshurst Read More »

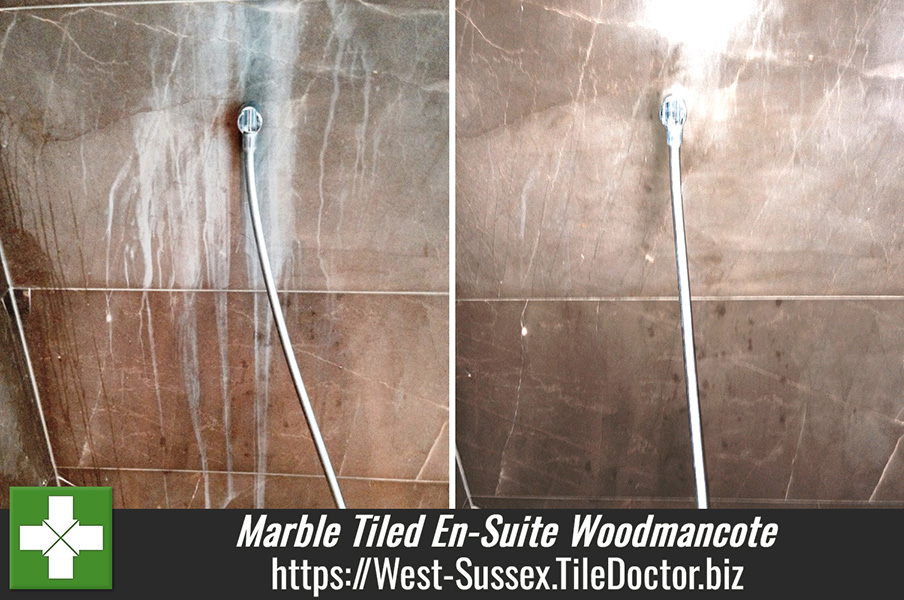
Damaged Marble Shower Tiles in Woodmancote Before After

Damaged Marble Tiled En-Suite in Woodmancote

Apologies in advance but I’m going to start this post with a warning; there are some very strong cleaning products available in supermarkets and most of which are completely unsuitable for use on natural stone floors because they contain acid. Even weak acids used over time will erode and reduce the life of a sealer and can lead to small holes appearing in your tiles so you do need to be careful what you apply and always read the label.

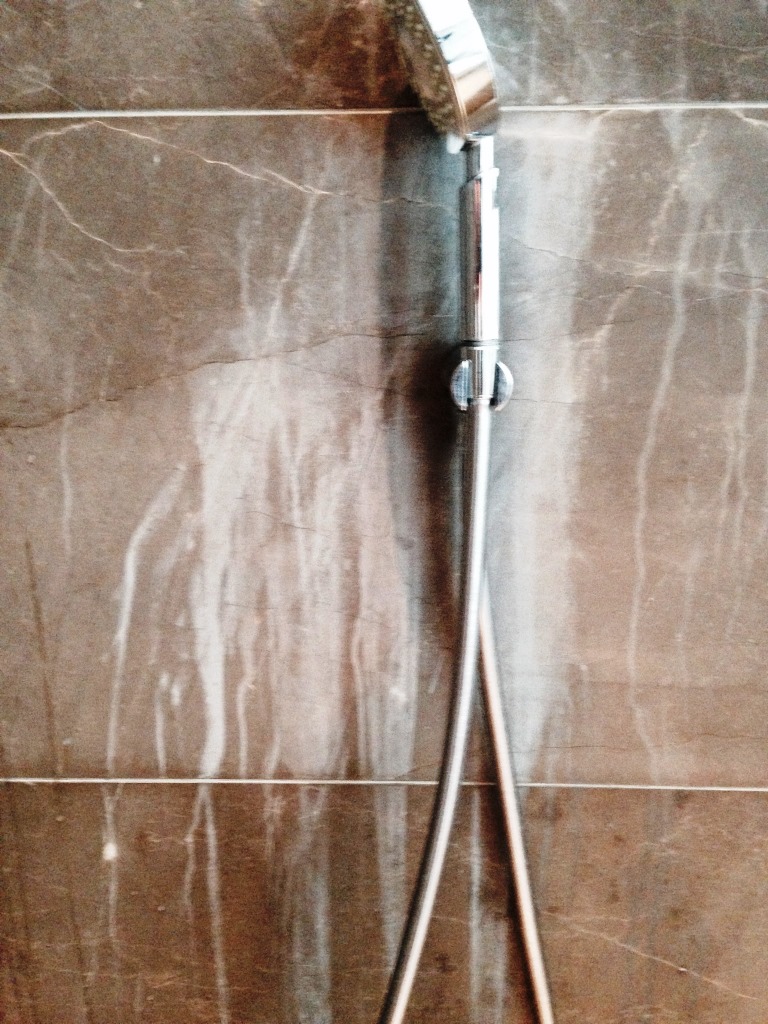
The reason I mention this is I recently had a client in the village of Woodmancote with a Marble Tiled En-Suite who had sent over some photographs showing how the tiles had become marked after using Cilit Bang to clean them. Cilit Bang is a very strong product and has a great reputation for tackling tricky cleaning problems however it contains Benzenesulfonic Acid so it should not to be used on Stone. If you check the literature it does not say it can be used on stone although it does mention the product can be used on tiles and I suspect this is where the confusion comes from as I suspect it should say ceramic tiles.

Getting back to the story I informed the client that it was tricky to tell from the photographs what would be required so I offered to pop round when next in the area and take a look. We offer a free no obligation home-survey so I arranged a site inspection and after the meeting I was confident that I could repair the damage to a level that meant that that it would be barely noticeable to the naked eye.

Damaged Marble Shower Tiles in Woodmancote Before Damaged Marble Shower Tiles in Woodmancote Before

Polishing Marble Shower Tiles

To resolve the problems I started by giving the Marble Tiles a general clean with a dilution of Tile Doctor Pro Clean and then followed this up by burnishing the stone with a 6 inch coarse diamond burnishing pad fitted to a hand held rotary machine. After going over the damaged area with this I then used the medium, find and super fine pads to restore the surface and build up the polish in the stone.

Sealing Marble Shower Tiles

When this was complete and I was satisfied that I had done all that was possible I waited for the Marble to dry and applied two coats of Tile Doctor Ultra Seal which is a penetrating sealer that will occupy the pores in the stone and prevent dirt become ingrained there. When the sealer was dry I gave it a light buff using a small Green pad. This added to the sheen and improved the way the Marble blended in with the surrounding Marble.

Damaged Marble Shower Tiles in Woodmancote After Damaged Marble Shower Tiles in Woodmancote After

It would have been impossible to get rid of the stain entirely but I’m happy to say by the time I had finished you could not notice the marks unless you looked at the area at point blank range and you knew where to look!

Travertine Shower Tiles refreshed in West Sussex

Damaged Marble Tiled En-Suite in Woodmancote Read More »

Victorian Tiled Floor Before After Restoration Eastbourne

Victorian Floor Tiles Restored in Eastbourne

The pictures below are from a Victorian tiled floor installed in a period house in the coastal town Eastbourne. The tiles had been covered lino and carpet for years which the owner had only recently removed during renovation work, as it turns out this was unfortunate as they then became covered in plaster and paint from the decorators. Although the floor did look to be in a very sorry state I was very confident that I could breathe new life into it given enough time so I allowed four days to complete the task.

Victorian Tiled Floor Before Restoration Eastbourne Victorian Tiled Floor Before Restoration Eastbourne

Cleaning a Victorian Floor Tiles

Some type of adhesive had been used to stick down the Lino and Carpet so the first step was to remove all the stubborn glue build up which I did using Tile Doctor Remove and Go, then once the bad areas had been targeted I concentrated on the plaster and paint build up which I treated using a 3-1 mix of Tile Doctor Pro-Clean in warm water worked in with a buffing machine fitted with a black scrubbing pad. The soiled water was rinsed away using a wet vacuum so the floor could be checked to see if more work was required which it was so stubborn areas that had resisted the initial cleaning onslaught were spot cleaned by using a diluted mix of Tile Doctor Grout Clean-up which is a very strong acidic product for removing grout and other mineral based substances from tiles. Before finishing the entire floor was given a thorough rinse to remove any trace of cleaning product, again a wet vacuum was used to remove the water and this time get the floor as dry as possible.

Sealing the Victorian Tiled Floor

The cleaning took place over two days and then the floor was given a further two days to allow it to dry fully after which I went back and sealed it with four coats of Tile Doctor Seal and Go which is an ideal sealer for Victorian tiles as it combines stain protection whilst giving the floor a subtle sheen appearance.

Victorian Tiled Floor After Restoration Eastbourne
Looking at the floor when the last coat went on it was hard to believe the state it was in when I first arrived. Incidentally the owner who had inherited the house told me that he had not seen the floor look that good when his parents were alive as he remembered it from his childhood. It always makes the job more worthwhile when you hear stories like that.

Victorian Tiled Floor After Restoration Eastbourne
 

Restoring a Victorian Tiled Floor

Victorian Floor Tiles Restored in Eastbourne Read More »

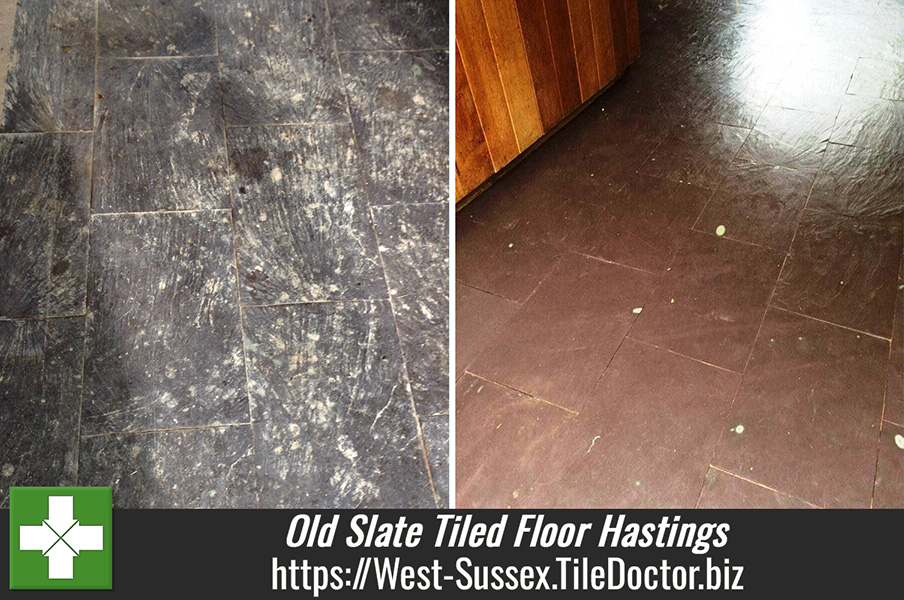
Slate Tiled Floor Hastings Before After Sealing

Old Slate Tiled Floor Renovated in Hastings

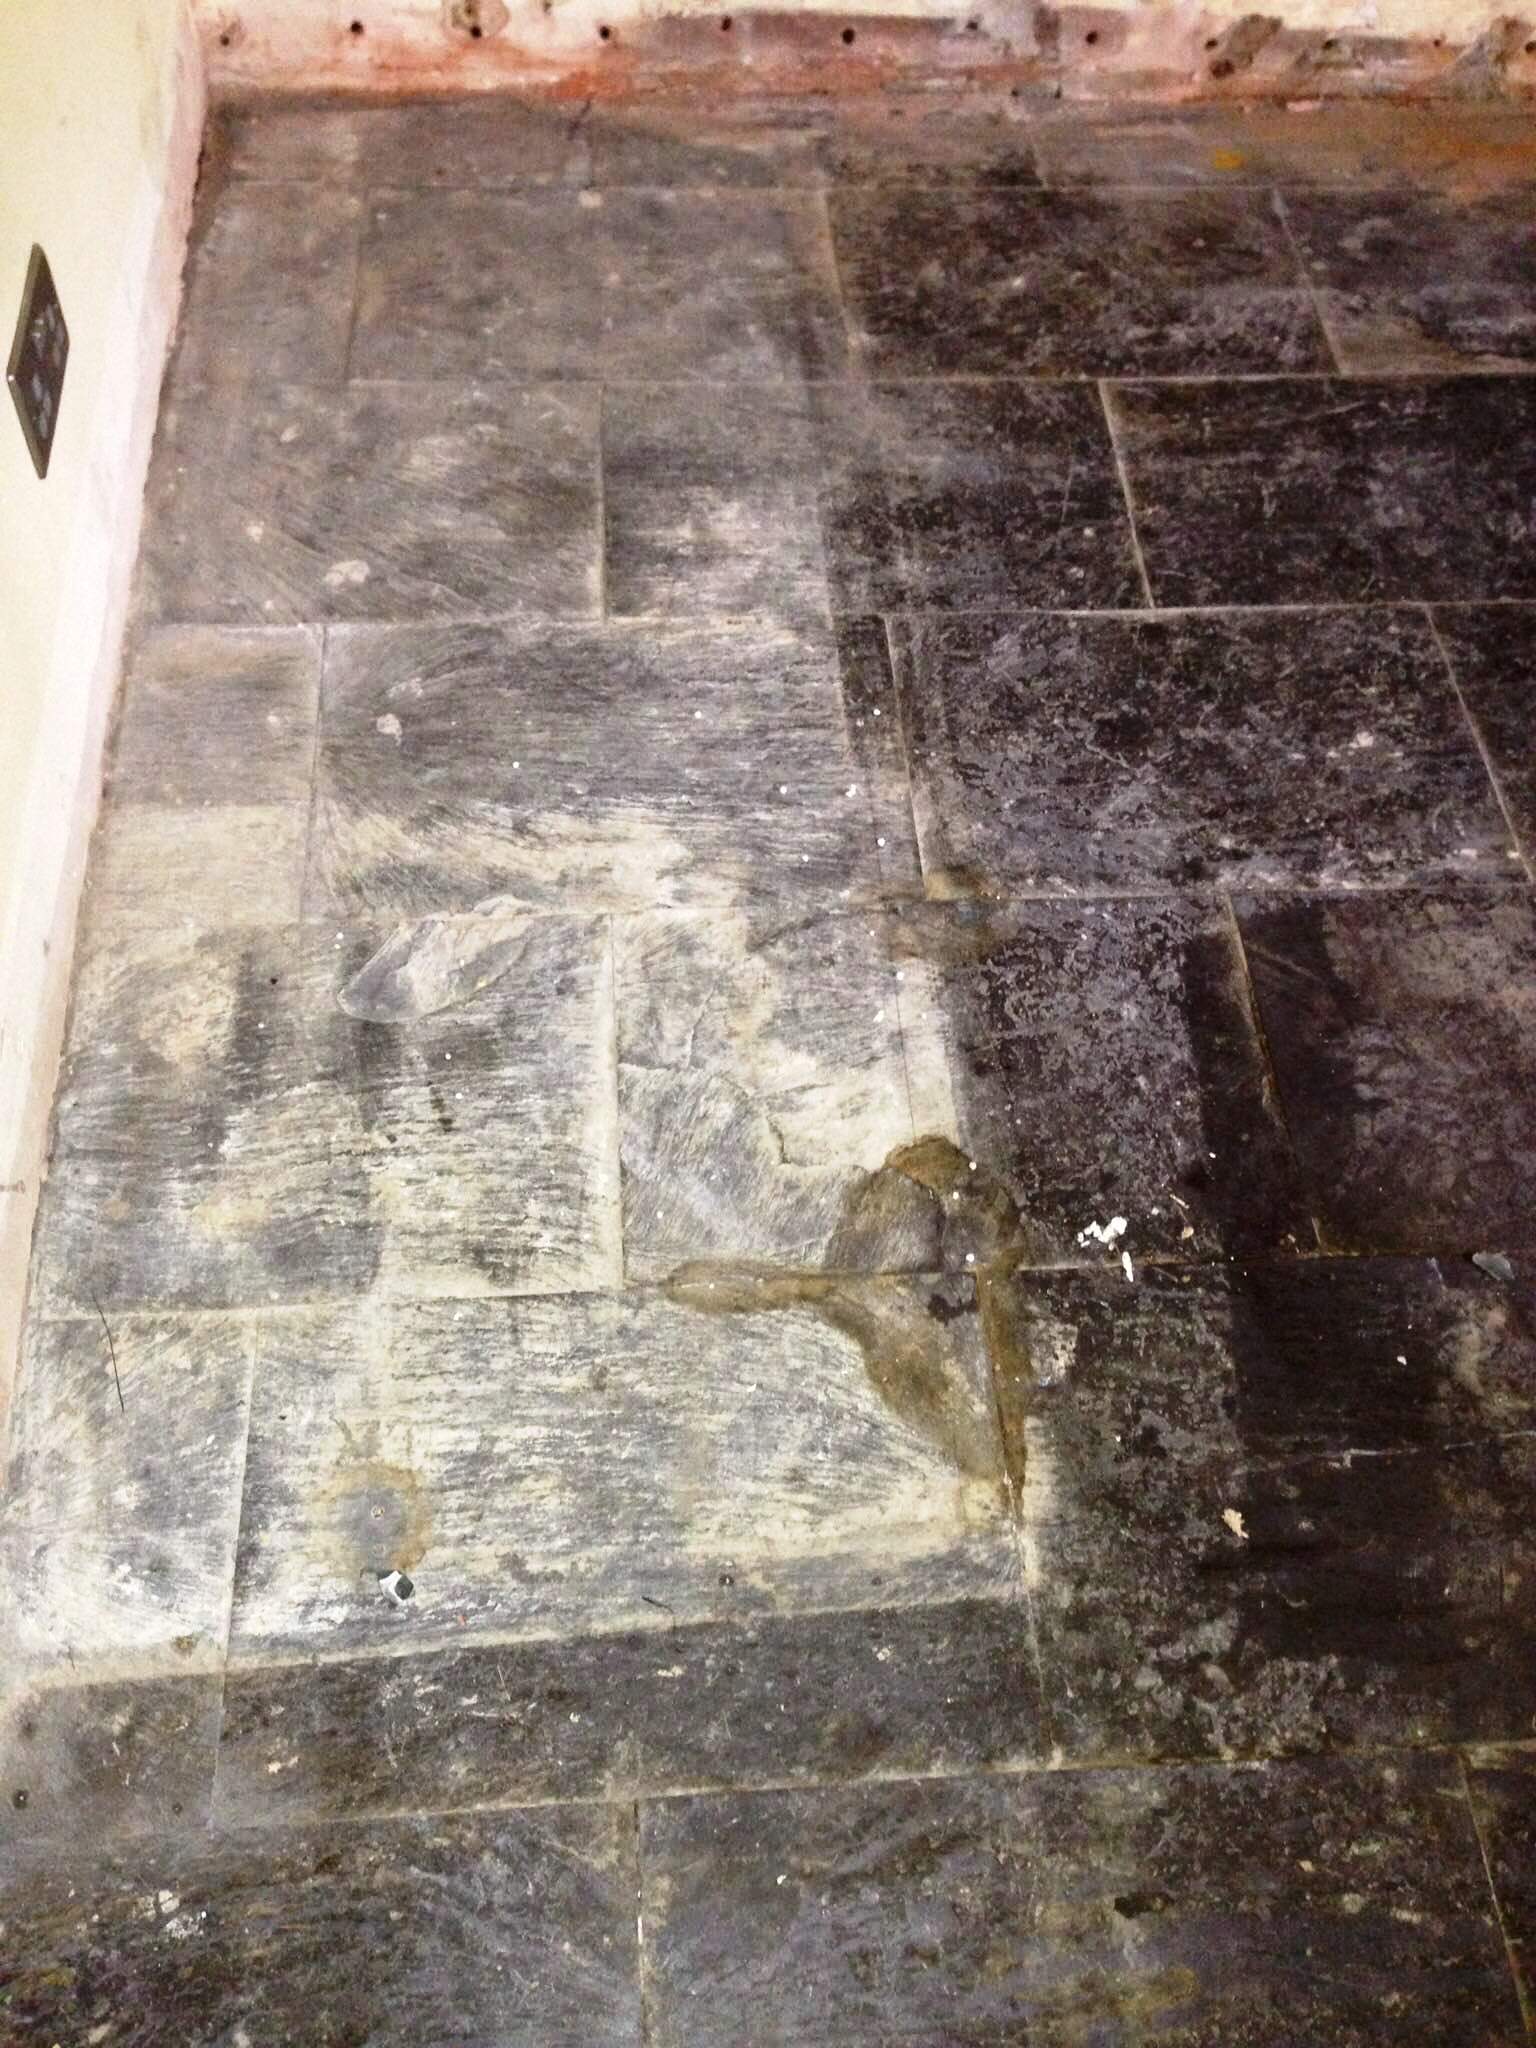
This Slate Tiled floor belongs to a client who had recently bought an old Oast House in Hastings. They were in the process of restoring it and when lifting up the floor discovered an original slate floor underneath it. As the photos show it was in a very poor state and they were unsure whether to rip it up or see if it could be renovated.

Slate Tiled Floor Hastings Before Cleaning Slate Tiled Floor Hastings Before Cleaning

On arrival they showed me the floor and told me of their dilemma; we provide a free no obligation home survey so after a thorough inspection I proceeded to run a test clean on a small section to see how well it would come up. This involved applying a 3-1 dilution of Tile Doctor Pro-Clean and working it in with a stiff brush and hand held buffer with a black scrubbing pad. I was very pleased to see the floor come up really clean and informed them I was very confident that not only could I get the floor clean it would amazing when finished. The clients were happy to hear the good news and gave me instructions to go ahead

Cleaning black slate floor tiles

On my return I applied the same strong 3:1 dilution of Tile Doctor Pro-Clean to the floor that I used before letting it soak into the tile for ten minutes before using a stiff brush and large buffing machine fitted with a scrubbing pad to clean the entire floor Slate tiled floor. When finished I went over the floor again looking for stubborn areas and spot treating them until I was happy with the result. Once happy I gave the floor a good rinse using fresh water to remove any trace of cleaning product from the floor and using a wet vacuum to remove the fluids and get the tiles as dry as possible.

Sealing Slate floor tiles

I left the floor for two days to allow time for it to completely dry out and returned to seal it using Tile Doctor Seal and Go. I applied four coats of sealer which gave the floor a fantastic finish and though the clients were initially weary of the shine I explained that it would dull down over a short period as it cured. Before leaving I gave them advice on how to keep the tiles clean and recommended the use of Tile Doctor Neutral Tile Cleaner which is a neutral PH cleaner that will not reduce the integrity and longevity of the sealer; they were both very happy with the end result as was I as the difference after was striking.

Slate Tiled Floor Hastings After Sealing Slate Tiled Floor Hastings After Sealing


Slate tiled floor cleaned and sealed in Sussex

Old Slate Tiled Floor Renovated in Hastings Read More »

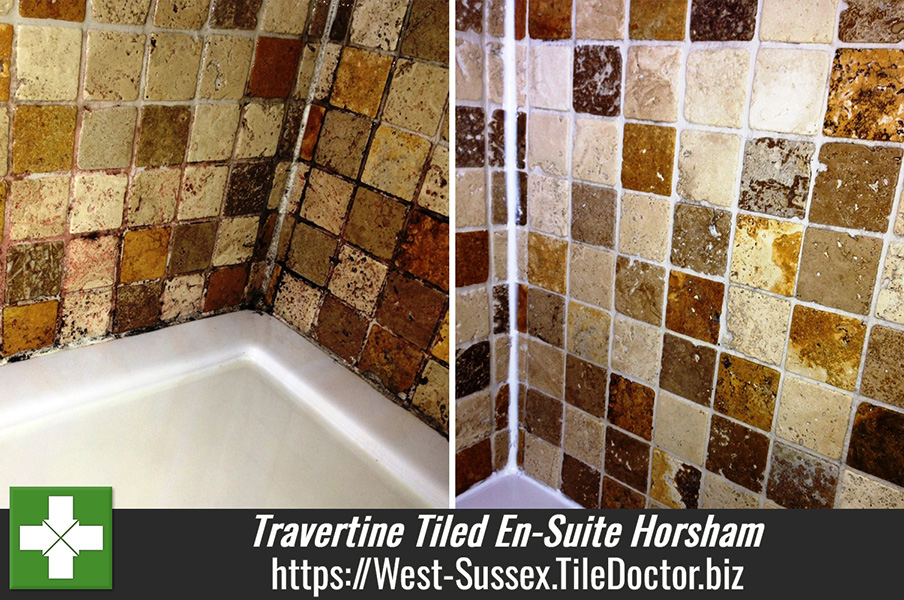
Travertine Bathroom ensuite After clean and seal Horsham

Travertine Tiled en-suite maintained in Horsham

The pictures below are from a Travertine tiled en-suite bathroom at a house in the town of Horsham. A black mould had become ingrained in the pores of the shower tiles and the owner wanted it cleaned up before she rented the property out. The client had tried various well known supermarket products to remove the mould and grime from the tile, grout and sealing strip but without success so we got a call.

Travertine Bathroom ensuite Before clean and seal Horsham

Cleaning Travertine Shower Tile

After explaining the cleaning process to the owner I set about the task by first cleaning the tiles and grout with a strong dilution of Tile Doctor Pro-Clean which was decanted into a spray bottle and sprayed onto the tile where it was allowed to soak in before being scrubbed in with a stiff brush. The wall was washed down with fresh water and stubborn areas re-treated. This worked well and removed all the discolouration and grime leaving the tiles and grout looking almost new.

Sealing Travertine Shower Tile

Travertine is a natural stone and to prevent grime penetrating into the pores of the tile making it difficult to clean it needs to be sealed so the next step was to let the tile and grout dry out followed by some assistance with a heat gun. Once they were dry we were able to seal them using two coats of Tile Doctor Colour Grow which is an impregnating sealer that also enhances the natural colour in the stone.

To finish the job we cleaned up the shower head and taps removing any calcium deposits and cleaned the shower screen. The old silicone sealer was discoloured and the only effective way to refresh it was to completely remove and replace it with new mould resistant silicone.

Once all the remedial work was complete the client came to have a look and was very pleased with the outcome as was I.

Travertine Bathroom ensuite After clean and seal Horsham
 

Travertine Shower Tiles refreshed in West Sussex

Travertine Tiled en-suite maintained in Horsham Read More »

Travertine Tiled Floor After Cleaning and Polishing

Travertine Tiled Floor Maintained in Horsham

This Travertine tiled floor was installed in the high traffic lobby area of a house in Horsham, the tiles were in reasonable condition but had become dull over the years and were now in need of a refresh

Travertine Tiled Floor Before

Cleaning Travertine Tile

I swept the floor and gave it a quick wash with Tile Doctor Pro-Clean paying particular attention to the grout joints on which I used a stiff hand brush along the grout lines to get them looking clean. The next step was to use the diamond encrusted burnishing pad system starting with the coarse pad and water to clean the tiles and remove any remaining sealant that may have been present on the tile. This was continued with the finer pads using nothing but water as before then rinsing the floor of any dirt picked up by the pads. When the floor was dry I used a green polishing pad to add a shine to the floor.

Sealing Travertine Tile

To protect the travertine it was sealed using two coats of Tile Doctor Colour Grow which is an impregnating sealer which enhances the natural colour in stone. Once it was all dry again I buffed it up again but used a soft white buffing pad. You can’t really appreciate the difference in the photographs however natural stones such as travertine tiles do need to be maintained on a regular basis if you want them to keep on looking good.

Travertine Tiled Floor After Cleaning and Polishing
 

Travertine Tiled floor refreshed in West Sussex

Travertine Tiled Floor Maintained in Horsham Read More »
=================================

West Sussex Tile Doctor

================================= Read More »

Scroll to Top